Small Format External RAID Solutions

Glyph GT062, G-Tech G-RAID2, Stardom SR3610

Review by Carlos Garza


Anyone running a DAW-based studio or video post house knows we are living through an explosion of digital materials. As custodians of the digital jewels, we are responsible for safekeeping, reliable access and occasionally, physical delivery.

When an external drive used as a scratch pad, the most important criteria are probably read and write speed. For archival, a redundant storage array offers protection from drive failure.

In this review we’ll look at three external drive enclosures with FireWire 800 interfaces and dual drives. The three enclosures support RAID striping, which splits the data across the pair for faster throughput. Two of the products support RAID1, which mirrors the data for safety.

Features

The three enclosures we tested have dual 500GB hard drives spinning at 7200 RPM and 16MB cache. Included are front-side activity indicators, internal fans and interfaces for USB2, FireWire 400 and FW800.

All three support RAID0 (striping) and have internal RAID controllers, meaning there is no dependence on special interface adapters and improved compatibility. The Stardom and Glyph also supported RAID1 (mirroring). The manufacturers offer configurations with larger drives and products with the faster eSATA interface. See sidebar for the fun facts.

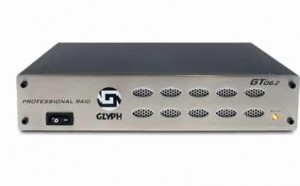
The Glyph drive ships with Glyph Manager software, which allows you to join the two, drives as JBOD, concatenated (spanning), RAID0 or RAID1. The software is well designed and easy to use. I really appreciated the convenience of a front-side power switch and the attractive, suitable-for-desktop housing.

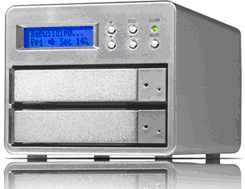
The Stardom drive has a small display on the front with 4 buttons to navigate the menu system. I was able to change the configuration from RAID1 to 0 without reading the manual. There is also has an RS232 port for monitoring. Not a bad idea in a production environment.

All three drives are light enough to be considered portable. Glyph makes this point by including a hard-shell plastic carrying case. Having personally carried drive enclosures across a Hollywood studio lot on a hot day, I can tell you the case is important!

In Use

I measured performance on a G5 Quad with 8GB RAM and an Intel MacBook Pro with 4GB, both with OS 10.5 and FW800 interface. All enclosures were configured for best performance, RAID0.

I drew from my activities in scoring for film and video for my “reel world” tests. They included dragging 170GB of audio files from G5 internal SATA drive (not the system drive) to external RAID0 and playback of multiple high bandwidth videos.

In Logic, I tested playback of up to 91 stereo tracks of 24/96 WAV audio. I bounced 87 such tracks to 24-bit/44.1kHz WAV interleaved with POW-R#1 dithering and normalization. Source and destination files were on the same storage device.

I used speed test utilities from Intech Software and Blackmagic Design to get a broader view of performance. With Intech’s QuickBench I looked at read/write speeds for small, medium and large files and recorded averages in each range. The Blackmagic tool mimics read/write speeds for “typical” video files. Your mileage may vary.

Here are the tests and results:

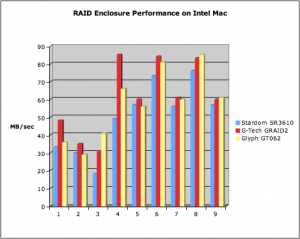
1                     QuickBench small file sequential read

2                     QuickBench small file sequential write

3                     QuickBench small file random readRAID Drives Speed Test

4                     QuickBench medium file read

5                     QuickBench medium file write

6                     QuickBench large file read

7                     QuickBench large file write

8                     Blackmagic Disk Speed Test Read

9                     Blackmagic Disk Speed Test Write

The chart above is based on the Intel MacBook results. On the G5, there were slight differences but the relative product differences were unchanged. Notice that the Glyph came out best with the Blackmagic utility and the G-Tech came out ahead with QuickBench. Let’s look at some detailed results.

G-Tech Performance

With the G-Tech I had 91 stereo tracks playing for up to 2 minutes without errors – quite a bit more than the 62-track limit of my single external 7200rpm drive. I then added a 640kbps MPEG-4 video to the Logic project the limit fell to 87 tracks. Respectable 2:08 performance in the bounce test and 60MBps on the drag and drop test.

I played up to four QuickTime videos at 100Mbps each. When I added a fifth copy of the clip, the playback was noticeably jerky. Four copies at once was the best I saw on the three enclosures.

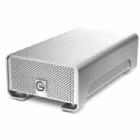
G-Tech G-RAID2

I created several “multiclips” in Final Cut Pro. I copied a 28Mbps clip and tested configurations of 3, 5 and 15 clips. On the G-Tech, I saw 3 clips playing smoothly in the viewer. With 5 clips, I saw occasional freeze frames and the15 clip multi was not usable. Your mileage will vary based on the bit-rate of your clips.

In the utility tests, on both the G5 and the Intel MacBook, the G-Tech excelled with sequential reads in files of all sizes. This could be advantageous for DAW tracking of pop songs and longer pieces such as classical and scores. It was not as fast as the Glyph in random small file reads.

Stardom SR3610F Performance

The Stardom came in third place in the utility speed tests but performed well with medium to large files on the Intel processor. It matched the G-Tech in the 100Mbps video clip test.

Stardom SR3610F

Figure 3 – Stardom SR3610F

I was surprised to see the offline bounce test take longer on the Stardom drive than on a single external drive. To be sure, I ran the test again and the second time it came in at 2:19 — longer again than my single drive but not by much.

I recorded 50MBps on the drag and drop test.

Glyph GT062 Performance

Performance was strong but slightly below the G-Tech. I was able to play only 3 of the 100Mbps videos simultaneously smoothly. It scored a respectable 60MBps in the drag and drop tests but only 84 simultaneous tracks of playback in Logic.

Glyph GT062

The offline bounce was the slowest of the three (2:24) but it scored the best by far in small file random reads. The 062 would be a good choice for audio productions involving many small files, including possibly sample streaming.

Glyph GT050Q (Bonus Round)

Glyph also provided a GT050Q enclosure, which holds a single 500GB drive, a Seagate 7200.11 HD, and includes an eSATA interface. I attached it to the MacBook Pro using a 2-port NitroAV eSATA II 3Gbps Express Card provided by FirewireDirect.

Interestingly, I found the single drive on the faster, 3Mbps SATA2 bus speed, was sufficient to play 4 copies of the 100Mbps video clip simultaneously.

Who needs storage interfaces faster than FW800? With uncompressed high def video pushing 1Gbps, interfaces like eSATA are attractive.

Summary

I saw that RAID0 striping provides a measurable increase in the number of audio tracks for DAW systems that support it. Note that Pro Tools does not support RAID drives for audio. The three RAID products tested performed well enough to handle most DAW and video post requirements.

The Stardom drive came in third place on the performance tests but excelled in some areas and it’s a versatile product. On both the G5 and the Intel MacBook, the G-Tech was fastest overall. In the case of random access tests, the Glyph GT062 came out ahead.

With Glyph supporting both RAID0 and RAID1 and the carrying case, it’s a virtual tie.

Carlos Garza has developed infrastructure solutions for asset management, post-production, on-line music sales and he has composed music for 15 feature films.
(c) 2009 Carlos Garza

DACS MIDI Patch Bay

By Carlos Garza
Originaly Published in Pro Audio Review.


DACS (Digital Audio & Computer Systems) has been producing hand-made products in the UK for more than 10 years. The DACS MIDI Patch Bay ($275), one of its oldest products, was recently re-engineered and is now available in the US through Independent Audio. The company set out to design a unit with simple visual feedback of signal path and high-performance specs.

Features

The DACS MIDI Patch Bay concept owes more to audio patch bay design thanconventional processor-based MIDI patch bays. Each of the single-rack-space unit’s 10 identical blocks house rear connectors for MIDI inputs and outputs as well as front panel patch points for routing the signal between blocks. Here’s the cool part: the front panel patch points are standard 1/4-inch two-pole audio jacks!  The signal is converted to Transistor Transistor Logic (TTL) format for it’s journey over two conductors.

DACS MIDI Patch Bay

DACS MIDI Patch Bay

Each block on the front panel has a pair of MIDI outs, a MIDI in and a MIDI thru. Patching is accomplished by attaching a 1/4-inch cable from one of the MIDI outs to the MIDI in of another block. Each block can drive only two other blocks directly, but the MIDI thru in any block provides a copy of its input signal that can be sent to an additional block. The active circuitry is powered by the MIDI signals flowing into the unit from the MIDI outputs of your devices. You need to connect a MIDI output for each MIDI input that you attach to the unit or it will be underpowered.

Optionally, an external 6.5V power supply can be used in lieu of matching the number of MIDI inputs and outputs. Individual blocks can be normalized to other blocks by soldering a wire between a “normal” pad on the top PCB to another pad labeled “in” on the bottom board. The MIDI Patch Bay has an open construction with exposed PCBs on the top and bottom. Some of the I/O labeling is on the PCBs.

In Use

My only real gripe with the unit is the shallow depth. I installed it in my Anvil rack between a Furman power conditioner and an AKAI S2000 sampler. The Furman reaches about halfway back into the rack and the AKAI goes all the way back. With the Patch Bay installed in the rack (and no gaps), I was not able to get my hands between the surrounding units to make the MIDI connections.

My studio environment is oriented around a Power Mac for sequencing and recording. My dilemma in testing the unit was figuring out how to integrate it with my existing MIDI interface. My fear was that repatching my modules through the DACS would make obsolete the OMS studio setups in the Mac. I attached my three AKAI S2000 samplers and a pair of controllers to the DACS. I also attached a few MIDI in/out pairs of my Opcode Studio 64 XTC MIDI interface. In a rehearsal scenario, I found that I could quickly and easily patch either controller directly to any module or several. For sequencing, could easily route either controller to the computer, back to the DACS, and on to any sound module. The visual feedback of the patch cables kept things clear.

I tested the speed of the thru circuits by daisy chaining a controller signal from the first block through every other block and finally into the Studio 64. I recorded several test sequences and I was not able to measure any latency between the DACS “delayed” signal and a parallel signal from the same controller (Kurzweil PC88MX). The test was conducted in Studio Vision Pro at 500 BPS and a resolution of 480 PPQ.

Summary

The DACS MIDI Patch Bay solves many common patching problems. My earlier gripe about the difficulty in making connections is somewhat mitigated by the fact that rear connections are not expected to change very often in a studio patch bay. On the other hand, making connections for transient equipment could be easier if the unit had a set of MIDI connectors on the front. Then again, you could just leave a couple of long MIDI cables attached to a block for visitors. For band rehearsals, it is nice to change MIDI routing without having to power up the Mac and launch OMS. Studios that use MIDI for automated mixing or effects patch changes may like the ease of swapping control signal sources and destinations.

The DACS would also be useful in environments that rely on rapid patching of multiple controllers to multiple modules (such as classrooms). Even environments with limited but frequent re-patching will benefit from the simplicity of a dedicated high-performance MIDI patch bay.

Contact: Independent Audio at 207-773-2424, www.independentaudio.com.

(c) 2002 Carlos Garza

Aphex Systems Model 204 Aural Exciter

By Carlos Garza
Originaly Published in Pro Audio Review.


Aphex Systems, celebrating 26 years in the pro-audio industry, has unleashed a revitalized version of its famous Aural Exciter. The Model 204 Aural Exciter with Optical Big Bottom is a big name for this single rack space box that packs a lot of flexibility into an affordable package. Engineers are constantly dealing with customers who want the loudest mix. “It has to go to 11 and have a big bottom.” Aphex was obviously listening and came up with a pair of effects that create the impression of a cleaner, louder mix without dangerous side effects.

204Face700x063

Features
So, what’s new in this replacement for the original Model 104? The new model adds frequency and dynamic control of low-end response, a revamped front panel and an internal power supply. The new millennium shiny finish and slightly textured knobs add a bit of sex appeal. The rear panel has a pair of operating level switches allowing independent selection between -10dBV and +4dBu. Inputs and outputs now include XLR connectors in addition to the 1/4-inch TRS found on the older model. Both inputs accept unbalanced inputs as well.

The manual is loaded with useful information on cable wiring and avoidance of ground loops. This includes diagrams for “pseudo-balanced” wiring of unbalanced equipment (for example, 1/4-inch TS to XLR).

The Model 204 also has separate controls for the Aural Exciter and Big Bottom. This means that you can use one channel as a low-end enhancer and the other as a high-end enhancer and bus each channel into separate effects sends on your console. The Aural Exciter and the Big Bottom sections each have a tuning knob that lets you select the range of frequencies for processing. You have to refer to the manual if you want to know exactly which frequencies you are selecting. A continuously variable knob is used to select the amount of harmonics added by the Aural Exciter.
The Tune control for the Aural Exciter sets the corner frequency for the high-pass filter. The lowest setting enhances frequencies from 800 Hz on up. Turning it completely clockwise means that you are only enhancing frequencies above 6.1 kHz. Likewise, the Tune control for the Big Bottom sets the highest frequency for bass enhancement (from 49 to 197 Hz).

The big story is the Optical Big Bottom circuit. This new circuit features a Light Dependent Resistor (LDR) that allows coupling of a controllable light source to a variable resistor. After passing the signal through the low-pass filter, the signal is fed through the adjustable drive circuit, which feeds the LDR. In principle, the LDR reacts immediately to the bass signal but fades slowly like a long release on a compressor. If you have the drive knob set correctly, you should hear more sustain from only the loudest notes. This is designed to produce a dynamic and resonant bass without a big increase in peak level.

In Use
I set out to restore some 1980s-era garage band recordings that originated on 1/2-inch 8-track and were mixed to 1/4-inch 2-track. I transferred the tracks into Pro Tools at Pepperland Recording and attached the Model 204 to the Digidesign 888 I/O using the balanced XLR connections. I created an effects loop using channel sends and an auxiliary bus for the return.
On some tracks, I wanted to bring out the vocal so I dialed in the lowest frequency on the Aural Exciter tuner. In cases where the vocal presence was fine, I went for enhancement of higher frequencies with the single goal of getting more “air.”  The manual says the 204 can “restore presence and clarity, improving transient response of individual tracks or the whole mix.” The 204 did not disappoint in this regard. Some of the tracks suffered from a distant and muted-sounding snare drum. The Aural Exciter made the attack transients brighter and sharper.

Of course, it will not fix a bad mix, but it can help produce a cleaner overall sound. When bypassed, I felt like I had to work to hear all of the instruments. With the effect in, I had no trouble hearing each part. The whole mix was up front, wider, and more balanced. Every instrument seemed to sit more consistently in its own space. The guitar had more bite, the keyboards were shimmering, the vocal was present and the words more intelligible.

One important aspect of the Aural Exciter and the Big Bottom is that the effects are more perceptual than physical. It sounds like there is a lot more bass and high end than is present on the signal meters. I found myself using less EQ in general. The Model 204 can also be used to preprocess tracks for low-quality playback. Listeners can be fooled into not missing the high frequencies that are lost in typical MP3 and cassette recordings if the high end that they do hear is enhanced.

I created some MP3 files and found that the effect was less noticeable than I had hoped. Cassettes had a more noticeable improvement (possibly because I used a high-grade tape). Some of my customers ask me to prepare backing tracks for dance and vocal competition. The final product, which goes out on cassette, has to sound clear and big. I found that the Big Bottom added a lively punch on most mixes.

Some of these sessions are rush jobs and it’s nice to be able to quickly see the when the input signal is being processed by the Big Bottom. I started with the Tune set at “12:00” and drive knobs turned all the way down. I then raised the drive slowly until the LED showed that the effect was active on most of the bass hits. Then I adjusted the Big Bottom Tune to focus the effect on the kick drum.

The result was more interesting than just adding low end EQ. The louder notes seemed to hang a bit more than the quiet notes. The intelligent transient sensitivity also made a muffled kick drum on one track sound crisp and clear. The effect was like changing a soft beater to a wooden beater. This is a very musically useful effect.

I only had a few quibbles with the 204: I would like to see the frequencies labeled on the front panel for the tuning knobs. I can imagine in a mixing situation dialing in frequencies on a shelving EQ and wanting to adjust appropriate frequencies in the Aural Exciter.
I also wish there was more control of the Big Bottom effect. Specifically, a release control for the low-end enhancer would really help tailor the effect to the tune/tempo.

Summary
I have had several studio customers that wanted to digitize and “restore” old recordings. Remember that a processor like this will not put back something that has been lost. When an analog tape has lost its high end, it is usually gone for good. However, the Model 204 can put a lot of life into a dull sounding track.

The harmonics that it constructs are useful and musical. You will hear each part with more clarity and presence. The versatility of inputs and separate channel processing makes this a worthy addition to any studio rack or live sound rig. At a suggested retail price of under $400, it is something to get excited about.

At a Glance

Applications:
Tracking; mixing; restoration; broadcast; webcast; live sound; dance clubs.

Key Features:
XLR and TRS I/O (+4 and -10); independent channels; independent control of aural Exciter and Big Bottom processing.

Price:
$399 MSRP
Contact: Aphex Systems, 818.767-2929, www.aphex.com, or circle Reader Service XX.

Product Points

Plus
• Independently operable channels for effects bussing
• Safely adds perceptual loudness
• Improves attack transients
• XLR connectors

Minus
• Front panel lacks frequency indicators
• No Big Bottom effect release control

The Score
Versatile effects in a refined package for a reasonable price.

(c) 2001 Carlos Garza